RackClick v0.9.0-rc10 · offline edition and online demo
This documentation describes the adopted version of RackClick as it is used in the browser: the offline file you download and the online demo, which is the same program. The screenshots come from the demo with synthetic data and the English interface. RackClick documents what you enter: it does not measure, discover devices or configure anything.
RackClick is a tool for network technicians that documents racks, devices, ports, cables and PoE as installed. Everything it shows is data a technician entered.
The core idea is Click-Click: click a free port, click another free port, and the connection is documented with both ends. Around that idea sit an inventory (Systemhaus, clients, locations, racks, devices), reports and labels for hand-over, and backup mechanisms so no work is lost.
Offline edition (adopted, v0.9.0-rc10, 2 October 2026): a single HTML file you open in the browser. No installation, no account, no Internet connection. It saves to browser storage and exports JSON.
Online demo: the same program, served from rackclick.net/demo with ten synthetic clients. Useful to try things without downloading anything. It offers no shared storage between people.
Server edition: under development, not available. It is described at the end of this documentation with its real status.
What RackClick does not do
It does not discover devices on the network or read configurations.
It does not measure PoE draw, electrical load, voltage or runtime: watts and budgets are values you document.
It does not verify that a physical link works: a drawn cable is a note.
It has no users or permissions in the offline file; whoever opens the file sees and edits everything.
Note
Names you type (clients, devices, locations, notes) are kept unchanged when you switch language. Only the interface controls and unedited sample texts are translated.
Note
The adopted version is v0.9.0-rc10 (2 October 2026): the same program as rc9 plus the language fix for German and Spanish. In the earlier rc9 file (SHA-256 63a60c4b…) those two interfaces still show a few strings in English (port states, the connection dialog, Label, Cables ON/OFF, the ← Project tab). Moving to rc10 needs no migration: same data format, same browser storage. Format names (CSV, PNG, PDF, XLS, QR) are never translated.
A.2Opening RackClick and verifying the download
You can start in the online demo or download the offline file. Both show the same interface and the same version.
How to
Demo: open rackclick.net/demo. The clients screen appears with the ten synthetic clients.
Offline edition: download RackClick-v0.9.0-rc10-Offline.html from the home page and open it with a current browser (Chrome, Edge, Firefox or Safari). Nothing needs to be installed.
Verify the download: compute its SHA-256 and compare it with downloads/SHA256SUMS.txt and the value published on the home page. Windows (PowerShell): Get-FileHash RackClick-v0.9.0-rc10-Offline.html -Algorithm SHA256 · Linux/macOS: sha256sum RackClick-v0.9.0-rc10-Offline.html.
To review how the program works, download the source code (RackClick-v0.9.0-rc10-Source.zip) and compare its hash too.
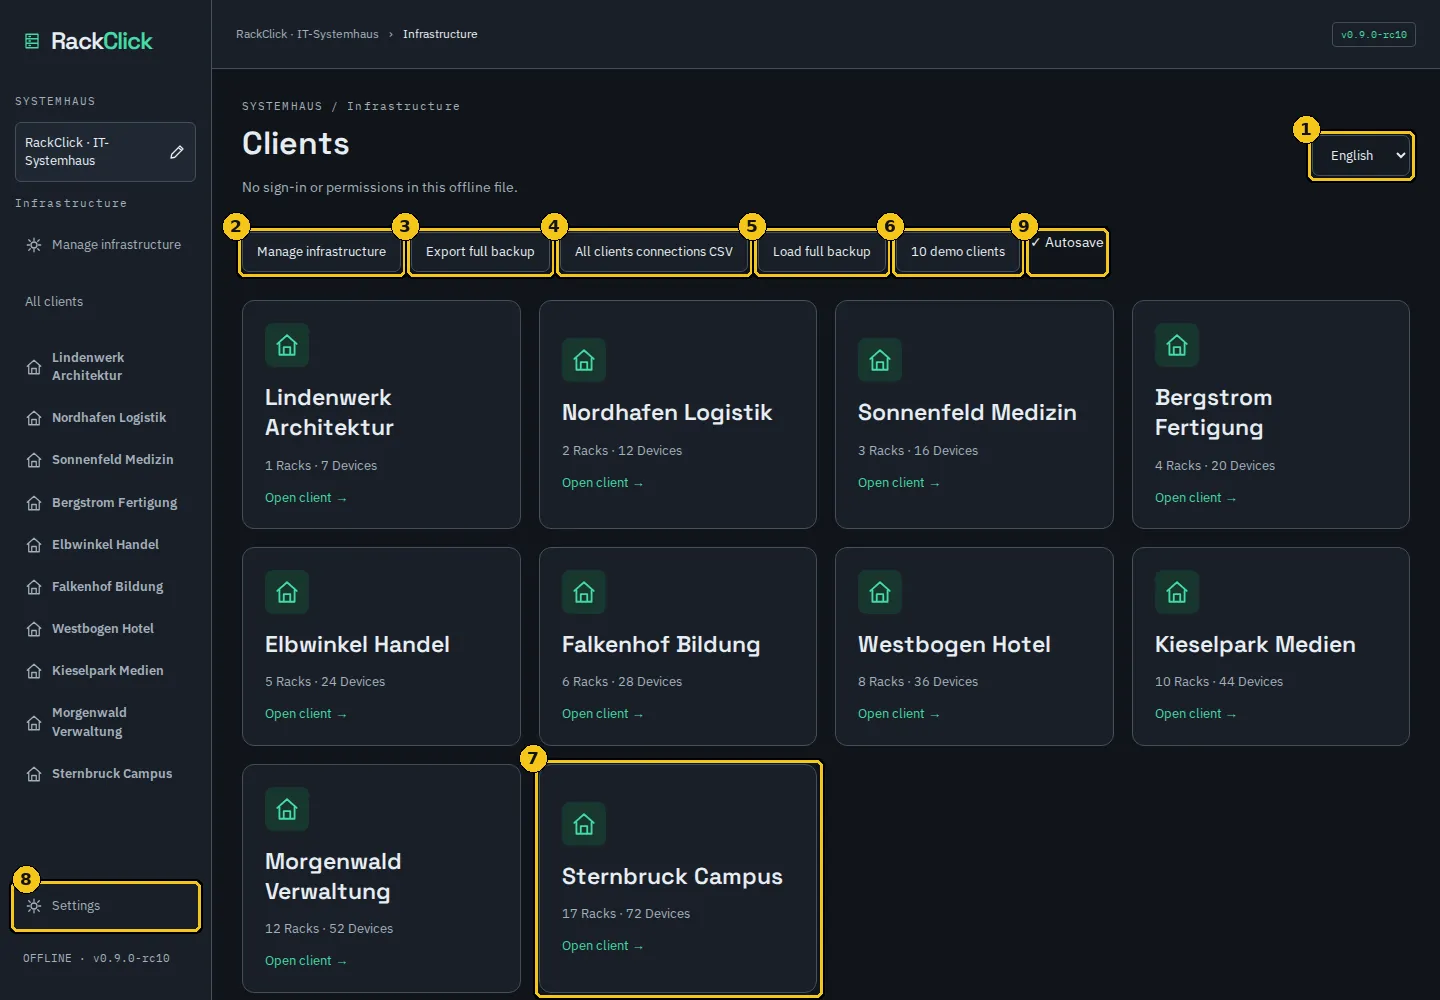
Screenshot 1Start screen: Systemhaus, client list and global tools.
A matching hash proves you have exactly the published file. It is not an antivirus certification; the VirusTotal reports linked from the home page are additional information.
Check
The sidebar shows OFFLINE · v0.9.0-rc10 in the offline edition and the client view states No sign-in or permissions in this offline file.
A.3How the information is organised
RackClick always follows the same hierarchy: Systemhaus → client → location → rack → device → port → connection.
Level
What it is
Where it is edited
Systemhaus
Your service company. Its name appears in the sidebar and in reports.
Settings → Systemhaus name, or the pencil next to the name in the sidebar
Client
Each company you serve. It has its own racks, reports and exports.
Manage infrastructure (create) · name field in the client view (rename)
Location
Site / building / room. Describes where each rack is installed.
Manage infrastructure
Rack
A cabinet with a number of rack units (U). Holds devices.
Client view → + Add Rack · rack pencil
Device
Patch panel, switch, server, firewall, UPS, PDU… with its port groups.
Rack view → + NEW DEVICE · device pencil
Port
Each interface of a device, with type, state, label, PoE and face (front/rear).
Right-click on the port · Port inspector
Connection
Two ports joined by a cable, with note, colour and patch status.
Click-Click · click on a connected port
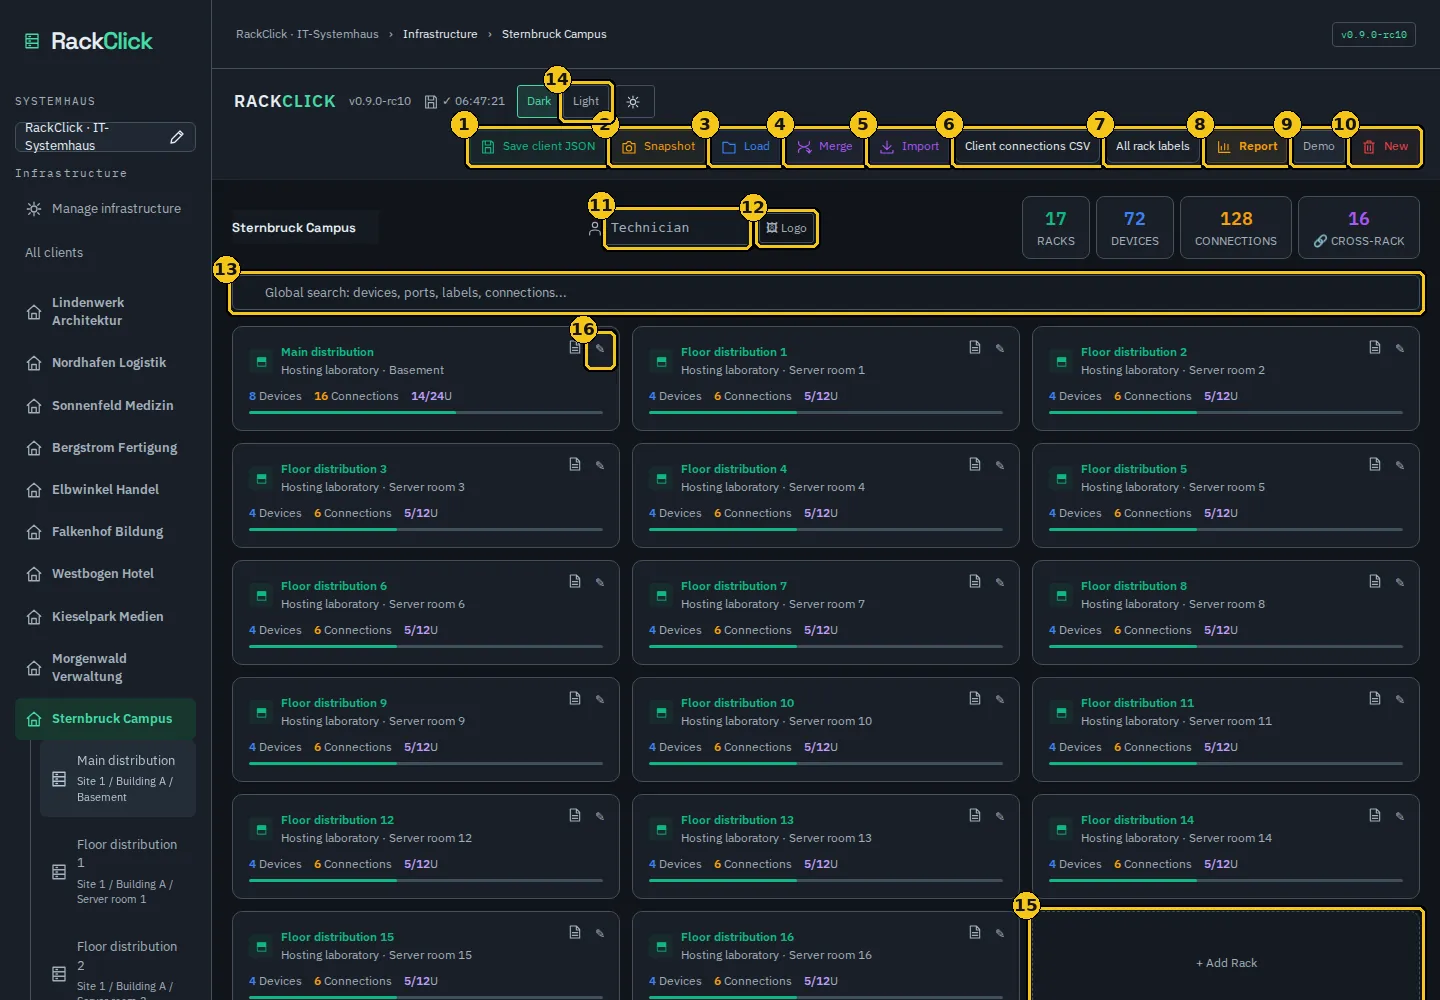
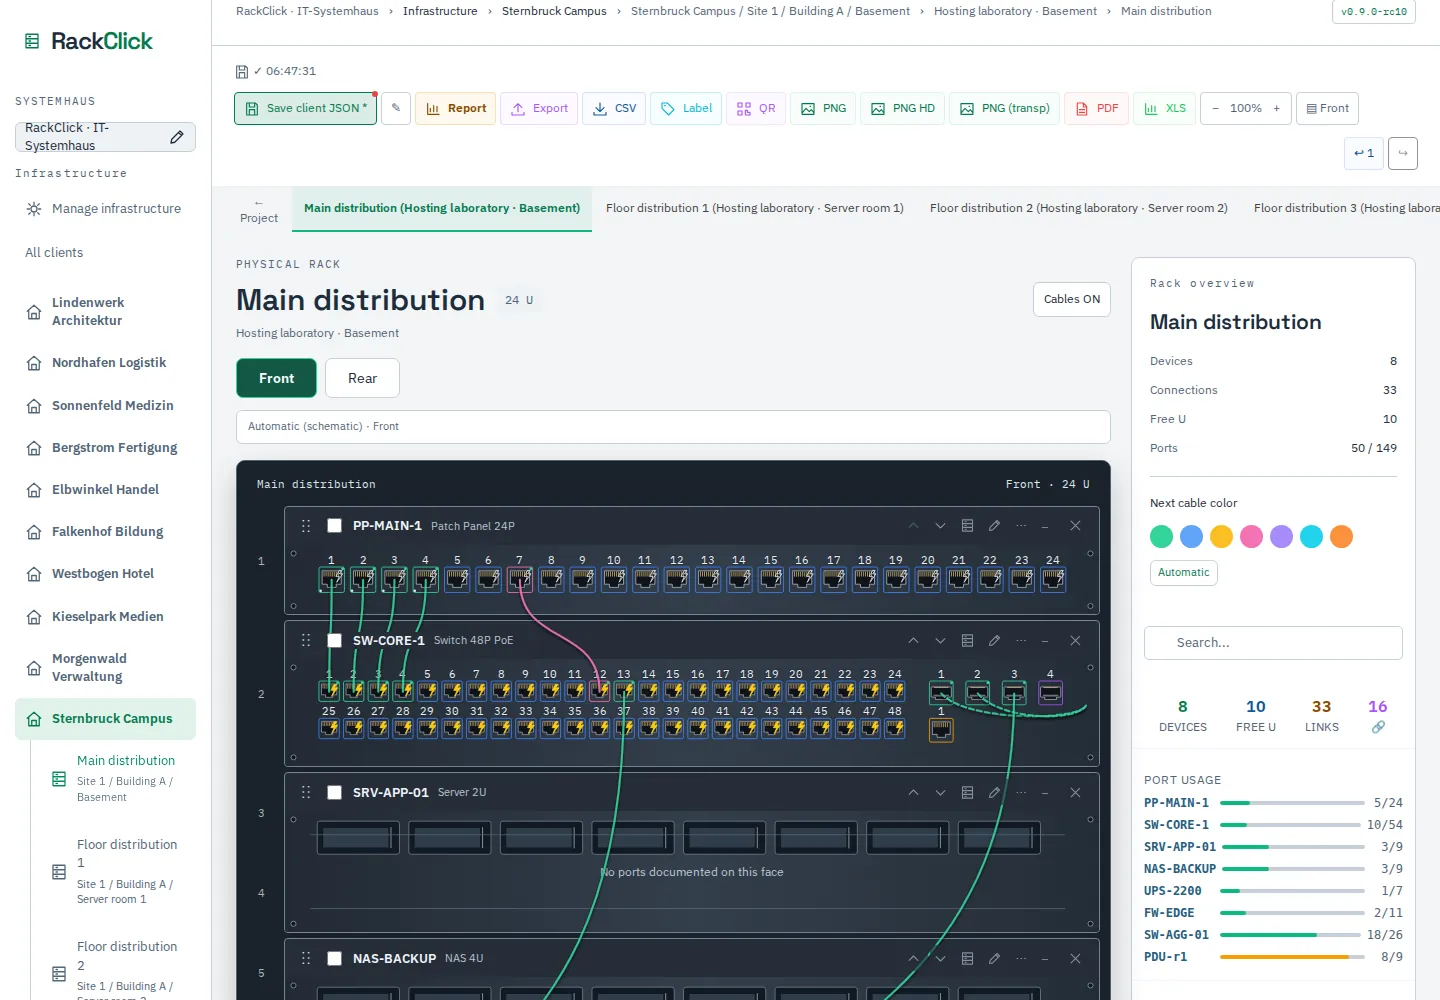
The left sidebar lists the Systemhaus, the clients and, inside the open client, its racks with their location. The breadcrumb at the top always shows where you are. In the rack view, the tabs switch between the racks of the same client; the first tab, ← Project, returns to the client view.
Screenshot 2Client view: toolbar, technician and logo, counters, search and rack cards.
The Systemhaus is the container for everything. Clients are independent of each other: what you export, print or replace in one client does not affect the others.
Renaming the Systemhaus
How to
Click the pencil next to the Systemhaus name in the sidebar, or open Settings and edit Systemhaus name.
The name is saved in the project and appears in reports.
Creating a client
How to
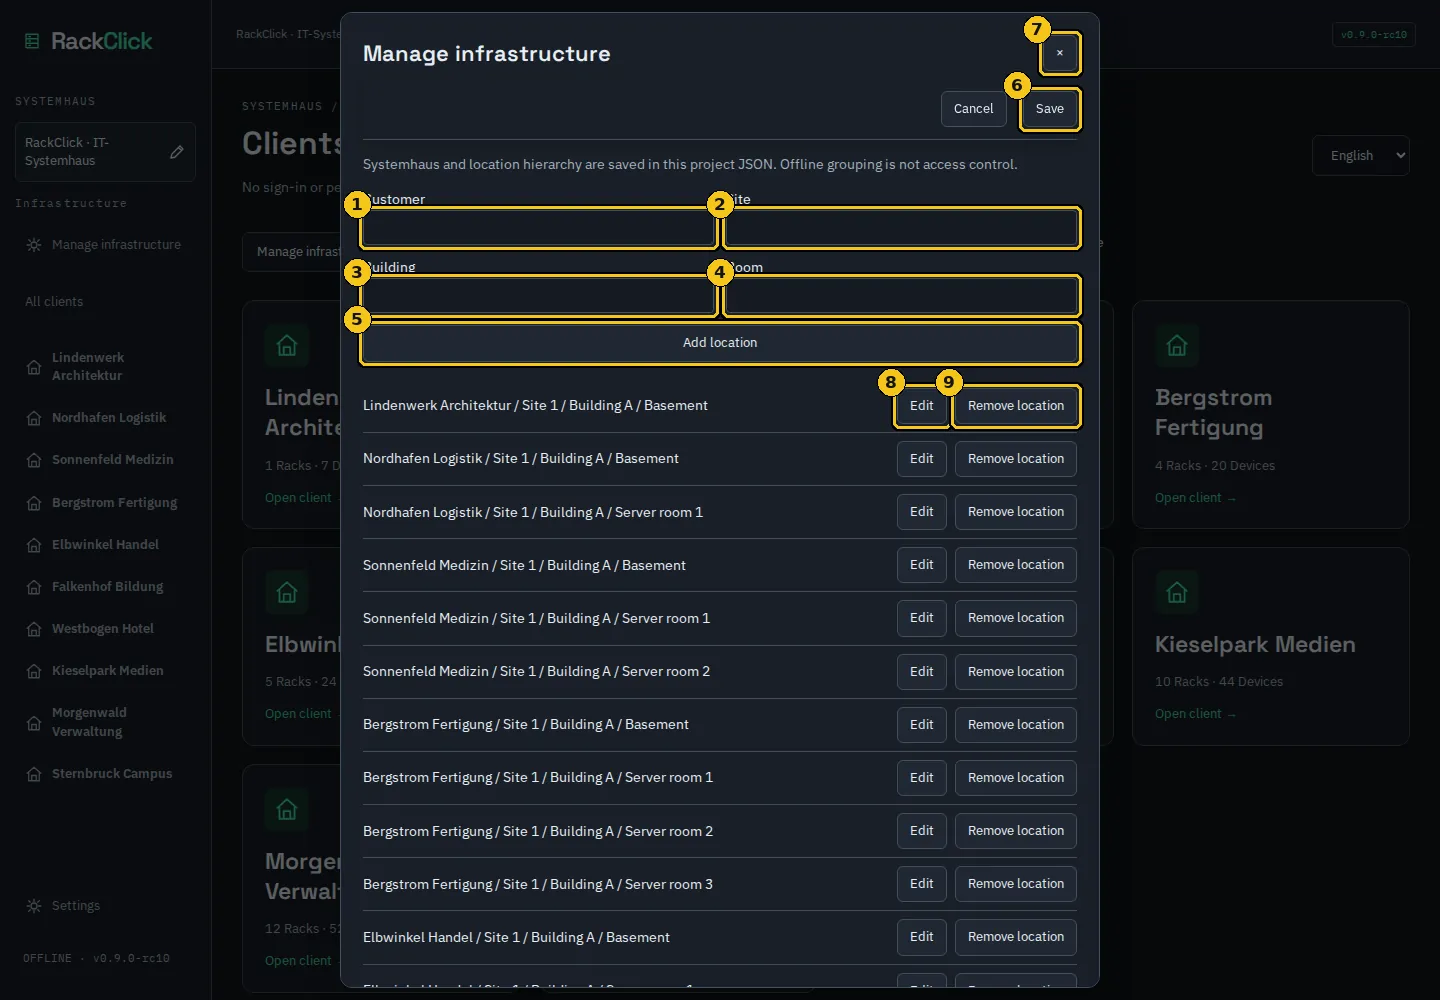
On the clients screen click Manage infrastructure.
Fill in Customer, Site, Building and Room and click Add location.
Click Save. The client appears in the sidebar and in the client list, without racks.
Renaming a client
How to
Open the client. Its name sits in an editable field above the search; change it and leave the field.
If the name already exists for another client, RackClick refuses: “Client name already exists.”
Screenshot 3Manage infrastructure: customer, site, building and room; location list with Edit and Remove location.
1Customer
2Site
3Building
4Room
5Add location
6Save
7Cancel
8Edit
9Remove location
Note
Grouping by client is an organisational aid. As the application itself says: “Systemhaus and location hierarchy are saved in this project JSON. Offline grouping is not access control.”
Check
When you open the new client, the view shows 0 racks, 0 devices, 0 connections and the + Add Rack button.
B.2Locations: site, building and room
Locations describe where each rack is. They are managed in a single dialog for all clients.
How to
Open Manage infrastructure (sidebar or clients screen).
To add: fill in Customer, Site, Building and Room and click Add location.
To correct: click Edit in the row, change the fields and confirm.
To remove: click Remove location. If racks are assigned, RackClick prevents it: “Location in use: move its racks first.”
At the top of the dialog (Assign rack) you can assign each rack to a location or leave it Unassigned.
Click Save. Cancel discards all changes made in the dialog.
Note
Save and Cancel stay fixed in the dialog header while you scroll through the list.
B.3Racks
A rack has a name, a location and a size in rack units. Devices occupy units from top to bottom; free units are hatched.
Creating a rack
How to
In the client view click + Add Rack and type the Rack name when the browser asks.
The rack appears as a card with its counts of devices, connections and used U.
Editing or deleting a rack
How to
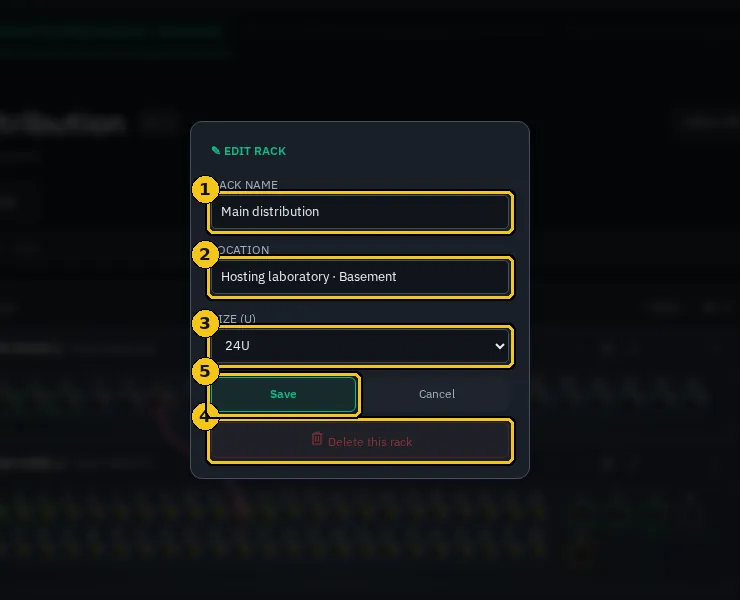
Open the rack and click the pencil (✎) in the toolbar, or the pencil on the card in the client view.
Change RACK NAME, LOCATION and SIZE (U): 6, 12, 16, 20, 24, 32, 42 or 48 U. If the devices already occupy more, the option shows (need N U) and cannot be chosen.
Delete this rack removes the rack with its devices and connections after confirming “Delete rack "X" and all its devices?”. Ctrl+Z works immediately afterwards.
Screenshot 4Edit rack: name, location, size and deletion.
1RACK NAME
2LOCATION
3SIZE (U)
4Delete this rack
5Save
Duplicating a rack
How to
On the rack card (client view) click the first icon in the top-right corner.
If the rack has connections, RackClick asks “Duplicate "X" WITH N connections? OK = with connections · Cancel = devices only”.
The copy is named X (Copy) and keeps location, size and devices.
Moving between racks
Inside a rack, the top tabs list all racks of the client; the first tab, ← Project, returns to the client view. The sidebar also shows the racks of the open client with their location.
Check
The right-hand Rack overview panel shows DEVICES, FREE U, LINKS and the PORT USAGE per device.
Part C · Devices
C.1Adding devices
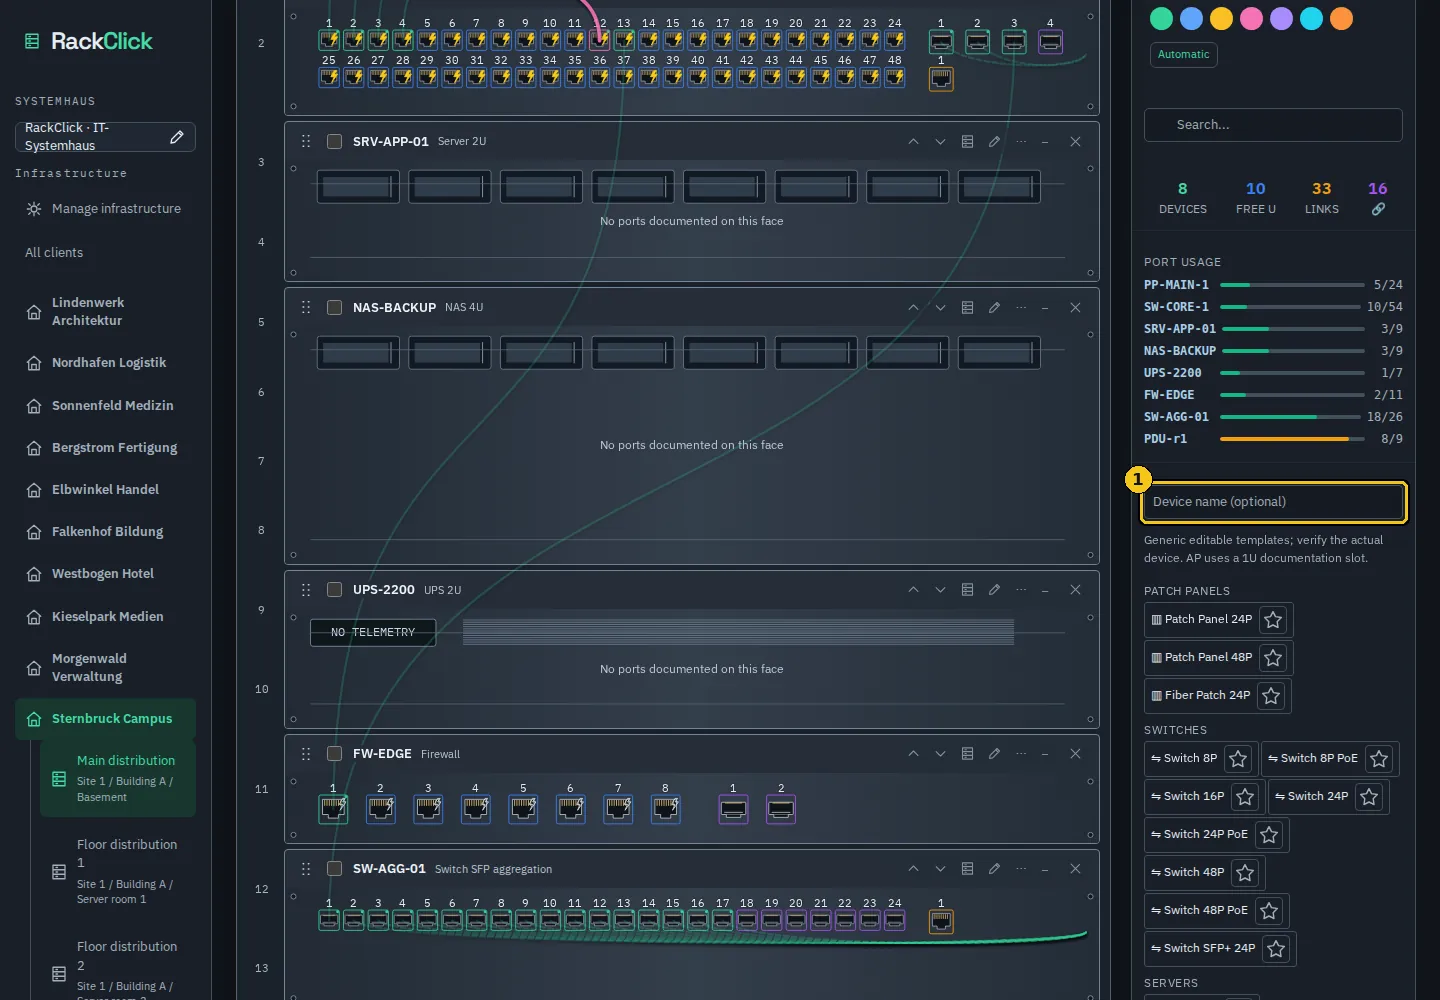
Devices are added from the catalogue in the right-hand panel: generic templates by category, favourites, your own templates or a custom device.
How to
In the rack view click + NEW DEVICE. The right-hand panel shows the catalogue.
Optional: type a name in Device name (optional); if you leave it empty, RackClick uses the template name.
Click a template from Patch Panels, Switches, Servers, Storage, Network, Power or Spacers. The device is added at the first free position in the rack.
The star next to each template marks it as a favourite; favourites appear at the top of the catalogue (FAVORITES).
For your own device open Custom Device: name, size (1, 2, 3, 4, 5, 6 or 8 U), icon and one or more port groups (type, count from 1 to 96 and face). + Port Group adds another group; click Create.
Click Cancel to close the catalogue without adding anything.
Screenshot 5Device catalogue: optional name, notice about generic templates, categories with favourite star.
1Device name (optional)
2Custom Device
Port type
Typical use
RJ45
Copper without PoE (patch panel, copper uplinks)
RJ45 PoE
Switch ports with documentable power
SFP/SFP+ · SFP28 · QSFP+
Fibre and DAC
MGMT · Console · USB-A · USB-C
Management and service
Power
Power inlets and outlets (PDU, UPS, power supplies)
Caution
The catalogue itself warns: “Generic editable templates; verify the actual device. AP uses a 1U documentation slot.” If a device does not fit, RackClick says: “The device does not fit in this rack. Check the available U.”
C.2Editing a device
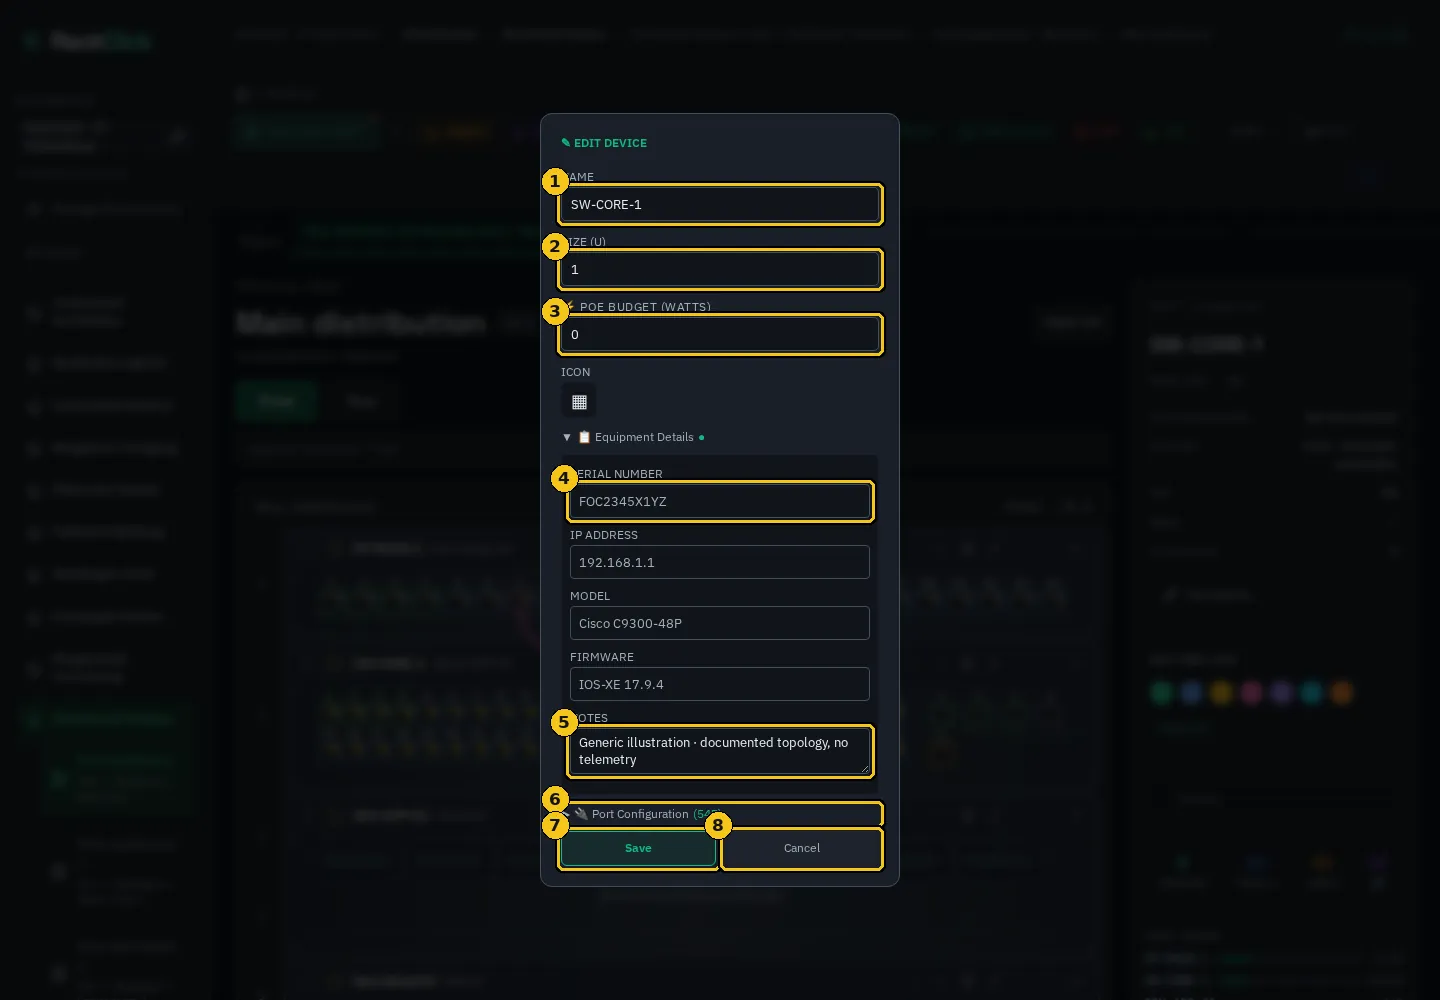
The edit dialog gathers the device data and its port configuration.
How to
Click the pencil (Edit) in the device header.
NAME, SIZE (U), PoE BUDGET (W) and ICON.
SERIAL NUMBER, IP ADDRESS, MODEL, FIRMWARE and NOTES: free text shown in tooltips and reports.
PORT GROUPS: each group has a type and a count. If you reduce the count, RackClick asks “Remove ports … and N connections?” before deleting ports and their connections.
Click Save. Cancel discards.
Screenshot 6Edit device: general data, details and port groups.
1NAME
2SIZE (U)
3PoE BUDGET (W)
4SERIAL NUMBER
5NOTES
6PORT GROUPS
7Save
8Cancel
Note
The device PoE budget and the watts of each port are documented values. The PORT USAGE panel shows PoE budget / documented watts and how many ports without watts remain.
C.3Sorting, moving, collapsing and deleting
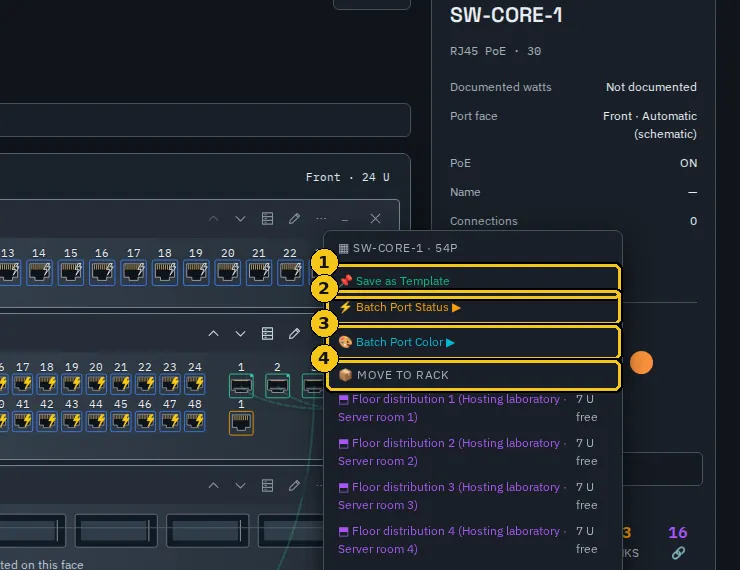
The header of each device gathers the position actions and the advanced options.
Control
Action
⋮⋮ (Drag to reorder)
Drag the device to another position in the rack
Checkbox (Select device)
With several devices selected, Del deletes them after confirming “Delete N devices? Affected connections: …”
∧ / ∨ (Move up / Move down)
Move one position
⋯ (Device options)
Save as Template · Batch Port Status · Batch Port Color · MOVE TO RACK
✎ (Edit)
Open the edit dialog
− (Collapse / expand)
Hide or show the ports
× (Delete)
Delete the device after confirming “Delete "X"? Active connections: N. Use Ctrl+Z to undo.”
Screenshot 7Device options (SW-CORE-1).
1Save as Template
2Batch Port Status
3Batch Port Color
4MOVE TO RACK
Moving a device to another rack
How to
Open Device options and pick the destination rack under MOVE TO RACK; each rack shows its free U.
RackClick summarises the impact: “Local connections to convert: N. Cross-rack connections to update: M.” Confirm.
The device is placed in the destination with its ports and connections; connections to devices of the original rack become cross-rack.
Check
After deleting, the notice ↩ Undo: … reminds you that Ctrl+Z reverts it while the tab stays open.
C.4Templates and favourites
Save a configured device as your own template and mark the templates you use most as favourites.
How to
To create a template: Device options → Save as Template. RackClick confirms “📌 Template "X" saved” and lists it under MY TEMPLATES in the catalogue.
To mark a favourite: click the star of the template in the catalogue. Favourites are listed under FAVORITES.
To remove templates or favourites: Settings → Saved templates / Favorites (Remove template, Remove favorite).
Note
Templates, favourites and snapshots are stored in the browser, not inside the project JSON. A JSON backup does not include them.
Part D · Ports and connections
D.1The port: state, label, PoE and colour
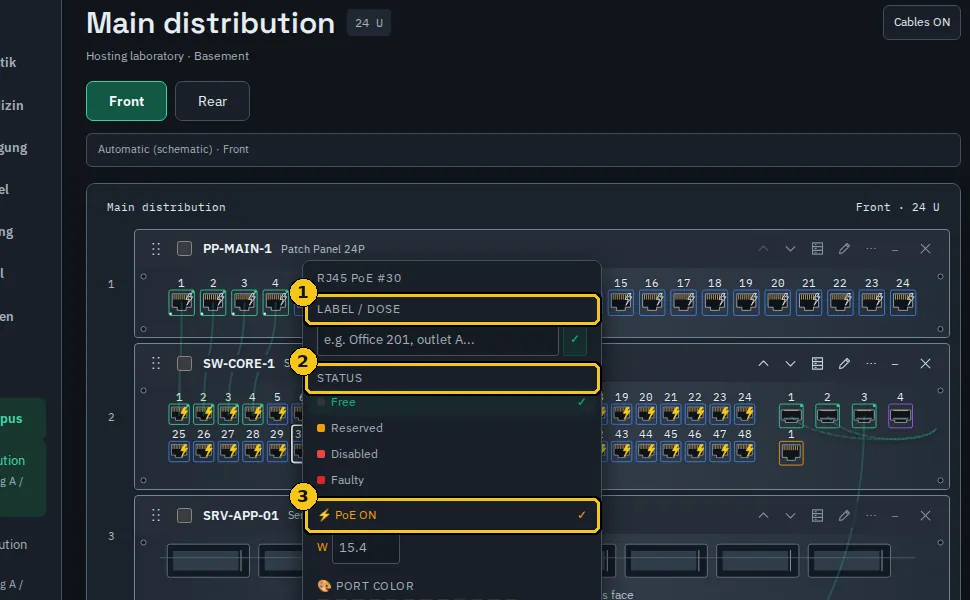
Each port has a type, a state, a label (outlet/dose), PoE with documented watts, a colour and a face. Right-click opens all actions.
How to
Right-click the port. The menu shows the identifier (e.g. RJ45 PoE #30).
LABEL / DOSE: type the outlet or destination (e.g. Office 201, outlet A) and confirm with ✓. A double-click on a free port asks for the label directly (Port label / outlet).
STATUS: Free, Reserved, Disabled or Faulty.
⚡ PoE ON: switch PoE on or off and enter the watts in the W field (0–90; “Documented watts must be between 0 and 90.”). The filled yellow bolt means documented active PoE.
PORT COLOR: a custom colour to distinguish the port; Reset color returns to the colour by type.
CONNECT TO RACK: starts a cross-rack connection (see below).
Screenshot 8Port menu: label, state, PoE and colour.
1LABEL / DOSE
2STATUS
3PoE
State
Effect
Free
Accepts connections
Reserved
A new connection asks first: “Reserved port — connect?”
Disabled
Refuses new connections: “Port is disabled/faulty — no new connections”
Faulty
Refuses new connections (same notice)
Port inspector
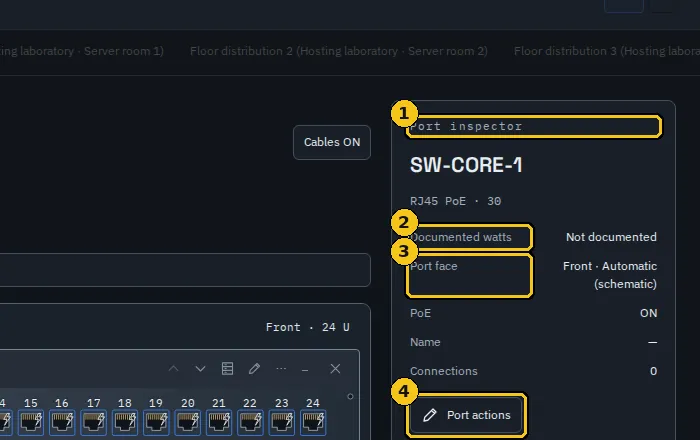
A left-click on a port selects it and shows the Port inspector in the right-hand panel: device, type and number, Documented watts, Port face, PoE, Name (label) and Connections. The Port actions button opens the same menu as the right-click.
Screenshot 9Port inspector.
1Port inspector
2Documented watts
3Port face
4Port actions
Note
Hover over a device to read serial number, IP address, model, firmware and notes; over a port, its label, state, PoE and connection.
D.2Click-Click: documenting a connection
A connection is two clicks: source and destination. RackClick draws the cable, counts it in the rack and includes it in reports, CSV and labels.
How to
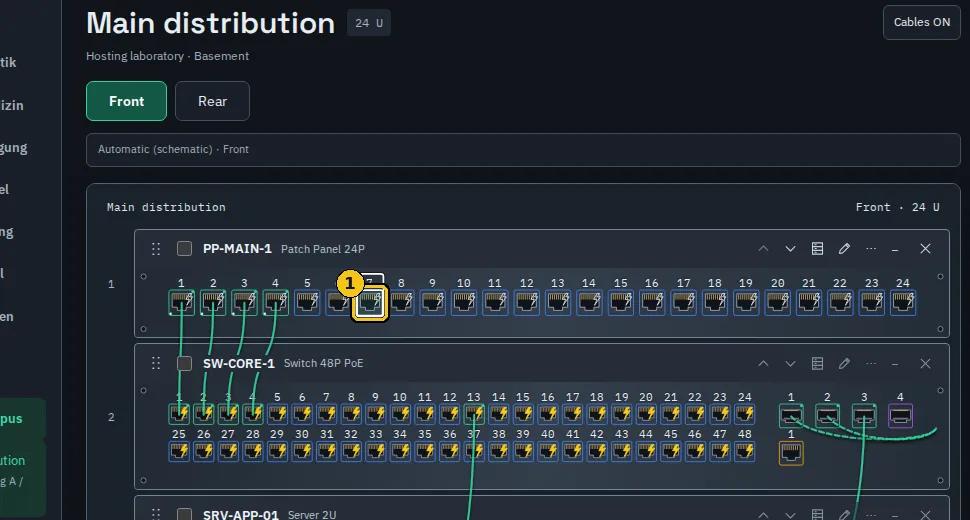
Click a free port: it is highlighted as the source.
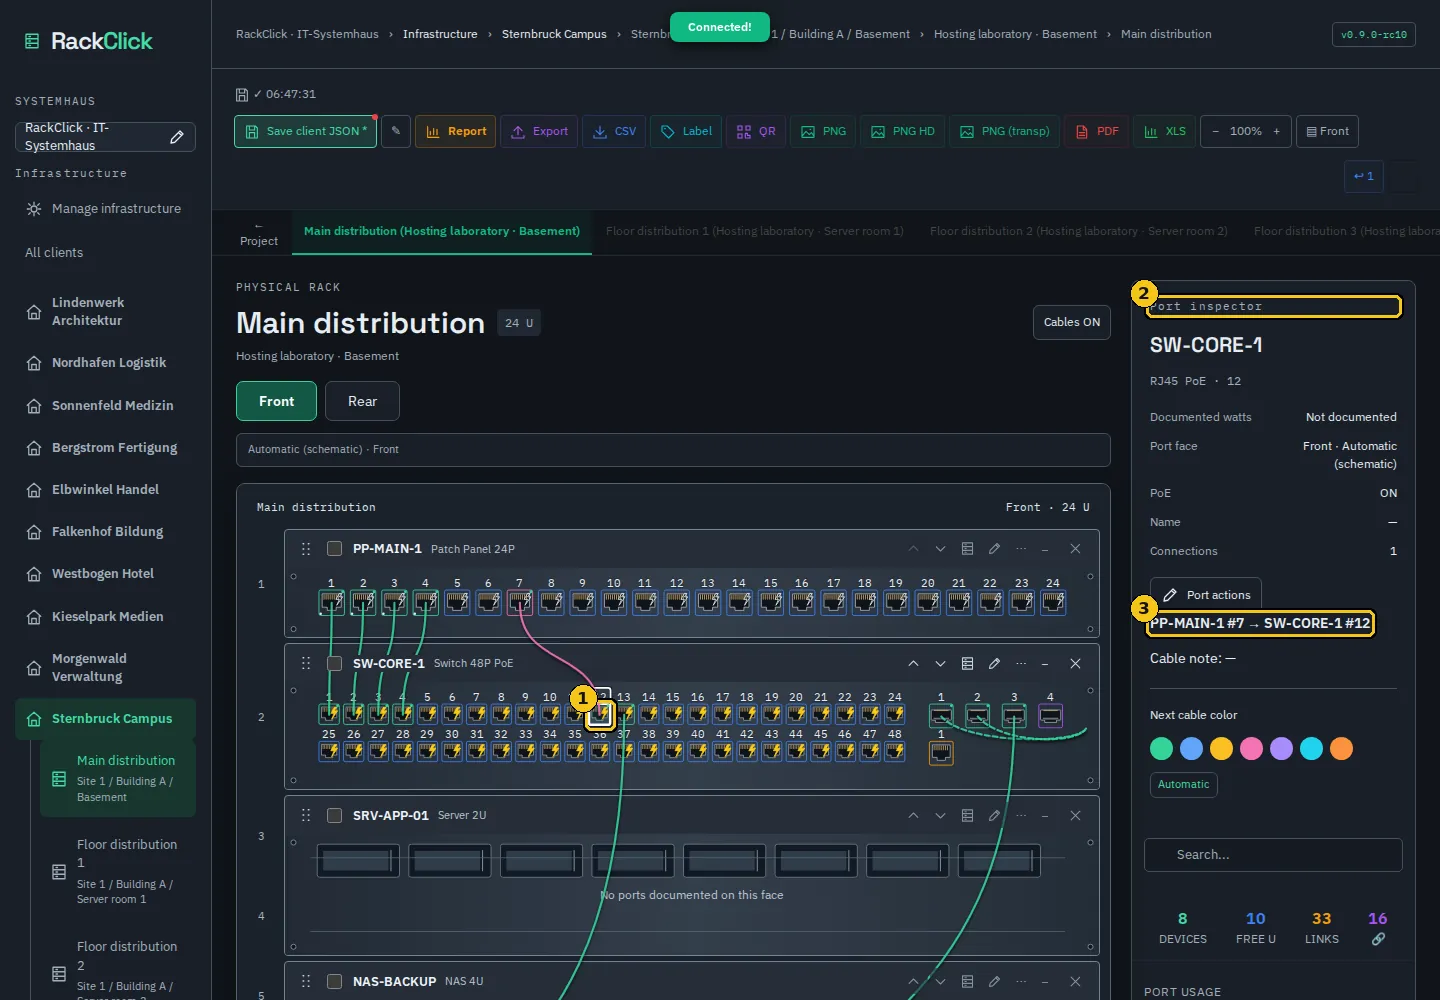
Click the free destination port, in the same device or in another device of the rack. “Connected!” appears and the cable is drawn in the next cable colour.
If the destination is Reserved, confirm “Reserved port — connect?”. If it is Disabled or Faulty, RackClick refuses and keeps the source selected: pick another destination or press Esc.
The connection appears in the CONNECTIONS list of the right-hand panel as DEVICE:port → DEVICE:port with its note.
Screenshot 10First click: port 7 of PP-MAIN-1 is selected as the source.
11 · PP-MAIN-1 · 7
Screenshot 11Second click: the connection PP-MAIN-1 #7 → SW-CORE-1 #12 is documented; the inspector shows both ends.
12 · SW-CORE-1 · 12
2Port inspector
3PP-MAIN-1 #7 → SW-CORE-1 #12
Next cable colour
In the right-hand panel (Next cable color) you choose a fixed colour or Automatic. In automatic mode the colour depends on the pair of device types (for example Patch Panel ↔ Switch) according to Settings → CONNECTION COLORS BY DEVICE GROUP. A manually chosen colour takes precedence.
Check
The rack’s LINKS counter increases by one and the PORT USAGE of both devices is updated.
D.3Editing, reconnecting and disconnecting
A click on a connected port opens the connection; a double-click reconnects it to another destination.
Note, patch status and colour
How to
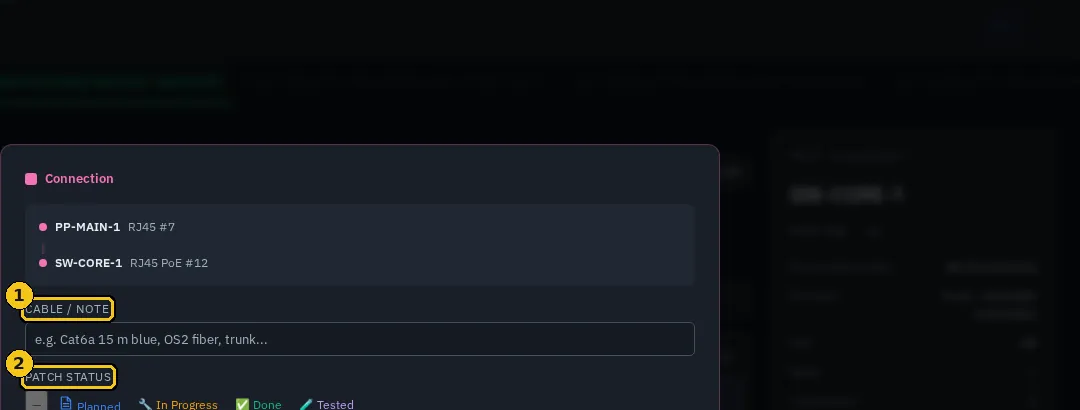
Click a connected port. The Connection dialog opens with both ends.
CABLE / NOTE: type, length, patch-cord colour, trunk… free text (e.g. Cat6a 15 m blue, OS2 fiber, trunk).
PATCH STATUS: —, Planned, In Progress, Done or Tested. It appears in the CSV and in reports.
COLOR: changes the colour of the drawn cable.
Disconnect removes the connection (“Disconnected”); Close keeps the changes.
Screenshot 12Connection dialog: note, patch status, colour, Disconnect and Close.
1CABLE / NOTE
2Patch status
3COLOR
4Disconnect
5Close
Reconnecting to another destination
How to
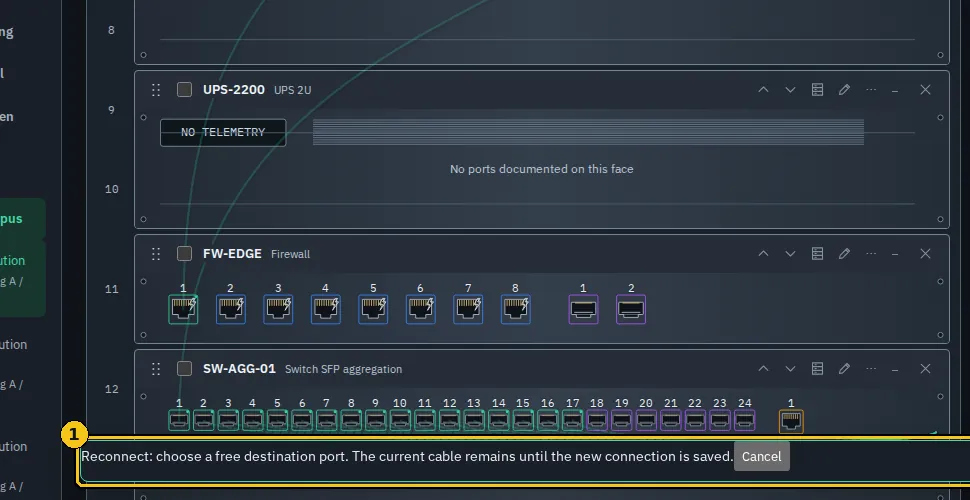
Double-click a connected port. The bar “Reconnect: choose a free destination port. The current cable remains until the new connection is saved.” appears.
Click the new free destination. RackClick confirms “Cable reconnected; attributes preserved.”: note, colour and patch status move to the new end.
Esc or Cancel abandons the reconnection without touching the original connection.
Screenshot 13Reconnection in progress: the bottom bar states that the current cable is kept until a destination is chosen.
1Reconnect: choose a free desti…
Note
If the destination is not valid, RackClick says “This cable cannot be reconnected here. Check occupancy, state and client.” and keeps the original connection.
D.4Connections between racks (cross-rack)
Connections can join ports of two racks of the same client.
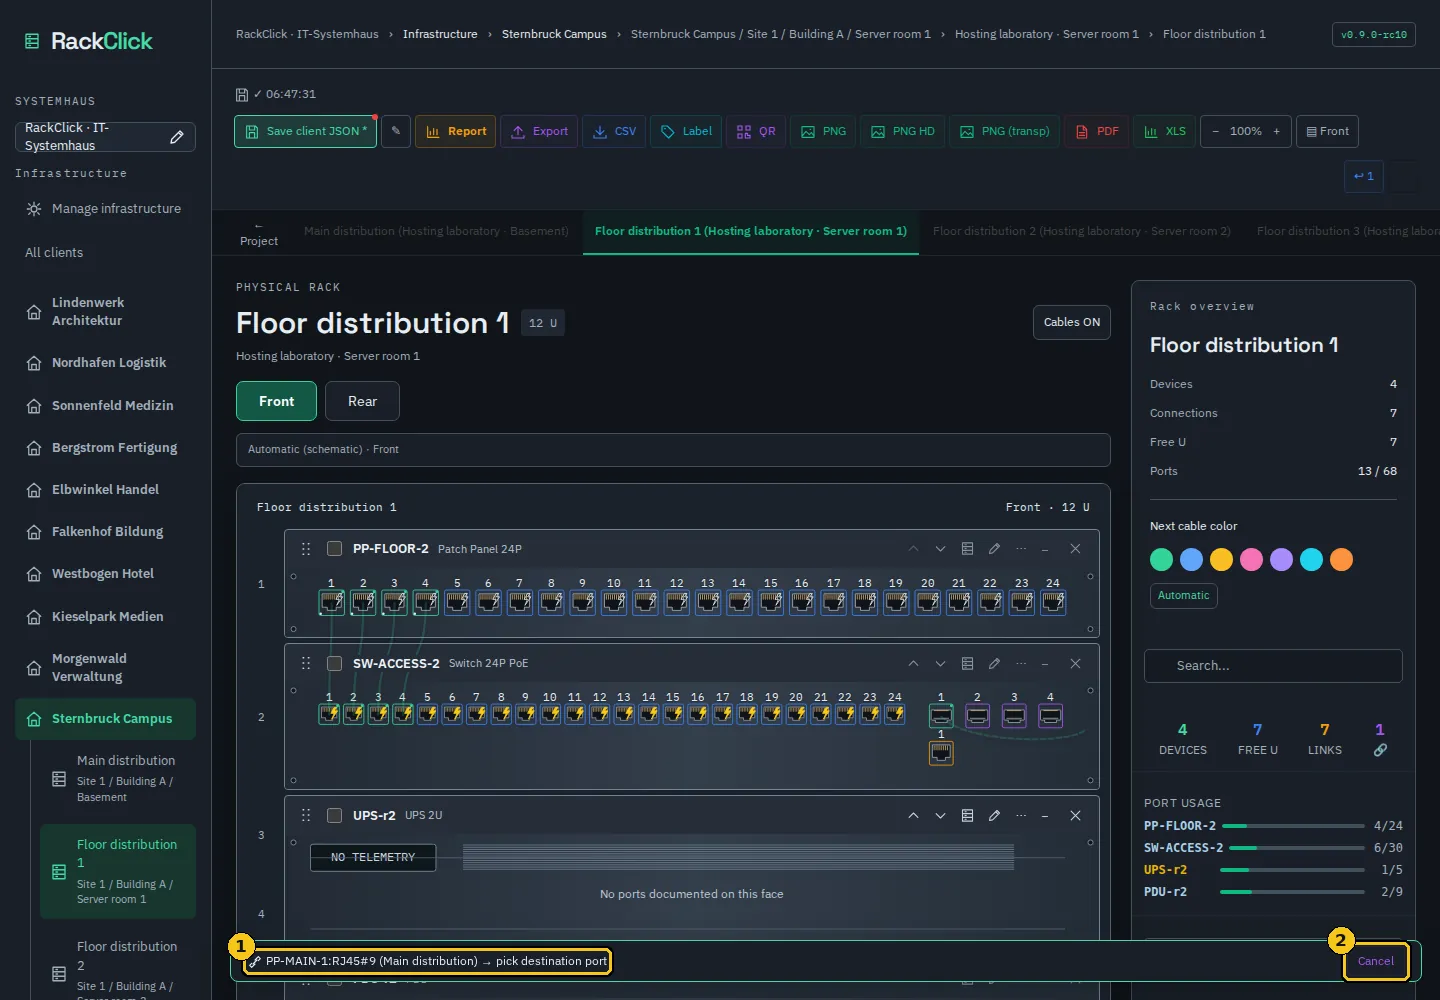
How to
Right-click the source port → CONNECT TO RACK → choose the destination rack.
RackClick opens that rack and shows the bar “🔗 Pick destination port in …”.
Click the free destination port. “Cross-rack connected!” appears.
To abandon, click Cancel in the bar or press Esc.
Screenshot 14Cross-rack bar in the destination rack.
1Pick destination port in …
2Cancel
Cross-rack connections are counted separately (CROSS-RACK in the client view), flagged in the Cross-Rack column of the CSV and shown in both racks. Rack labels count local connections only.
Caution
If connections exist between racks of different clients (inherited from old projects), RackClick blocks single-client export and replacement: “Connections between clients exist. Export the full backup to preserve them; single-client export/replacement is blocked.”
D.5Bulk connection 1:1
Connect the free ports of one device to those of another in order, in a single operation.
How to
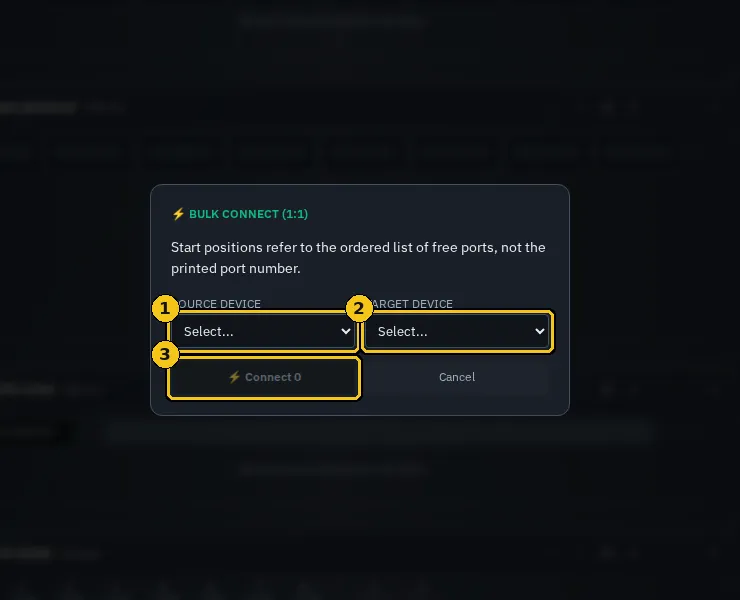
In the right-hand panel click ⚡ BULK (the BULK CONNECT (1:1) dialog opens).
Choose SOURCE DEVICE and TARGET DEVICE.
START AT: “Start positions refer to the ordered list of free ports, not the printed port number.” Adjust COUNT and review the PREVIEW.
Click Connect. RackClick confirms “⚡ N connections created”.
Screenshot 15Bulk connection 1:1.
1SOURCE DEVICE
2TARGET DEVICE
3Connect
Note
Bulk connections respect the states: Reserved, Disabled or Faulty ports are not used.
D.6Front, rear and port faces
Each device has two faces. The Front/Rear view of the rack shows only the ports documented on that face.
How to
Switch between Front and Rear with the buttons under the rack title or the toolbar button.
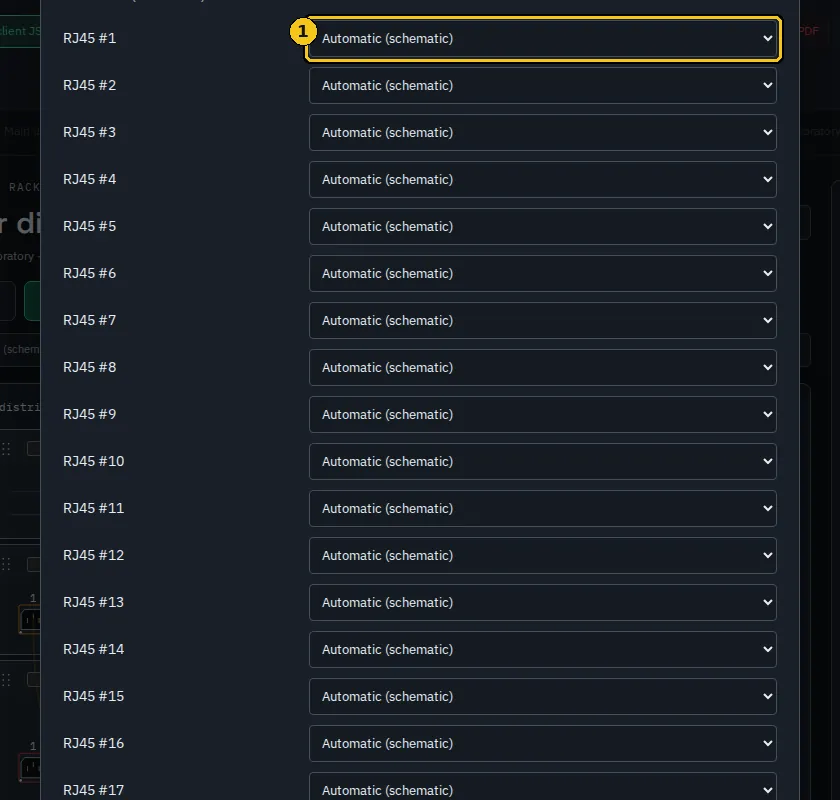
By default the placement is Automatic (schematic): RackClick decides the face by port type.
To fix faces: in the device header click Configure faces and choose, port by port, Automatic, Front or Rear (Port face). Click Save.
Connections that cross from one face to the other are kept; switch views to see each end. A device with no ports on the visible face shows “No ports documented on this face”.
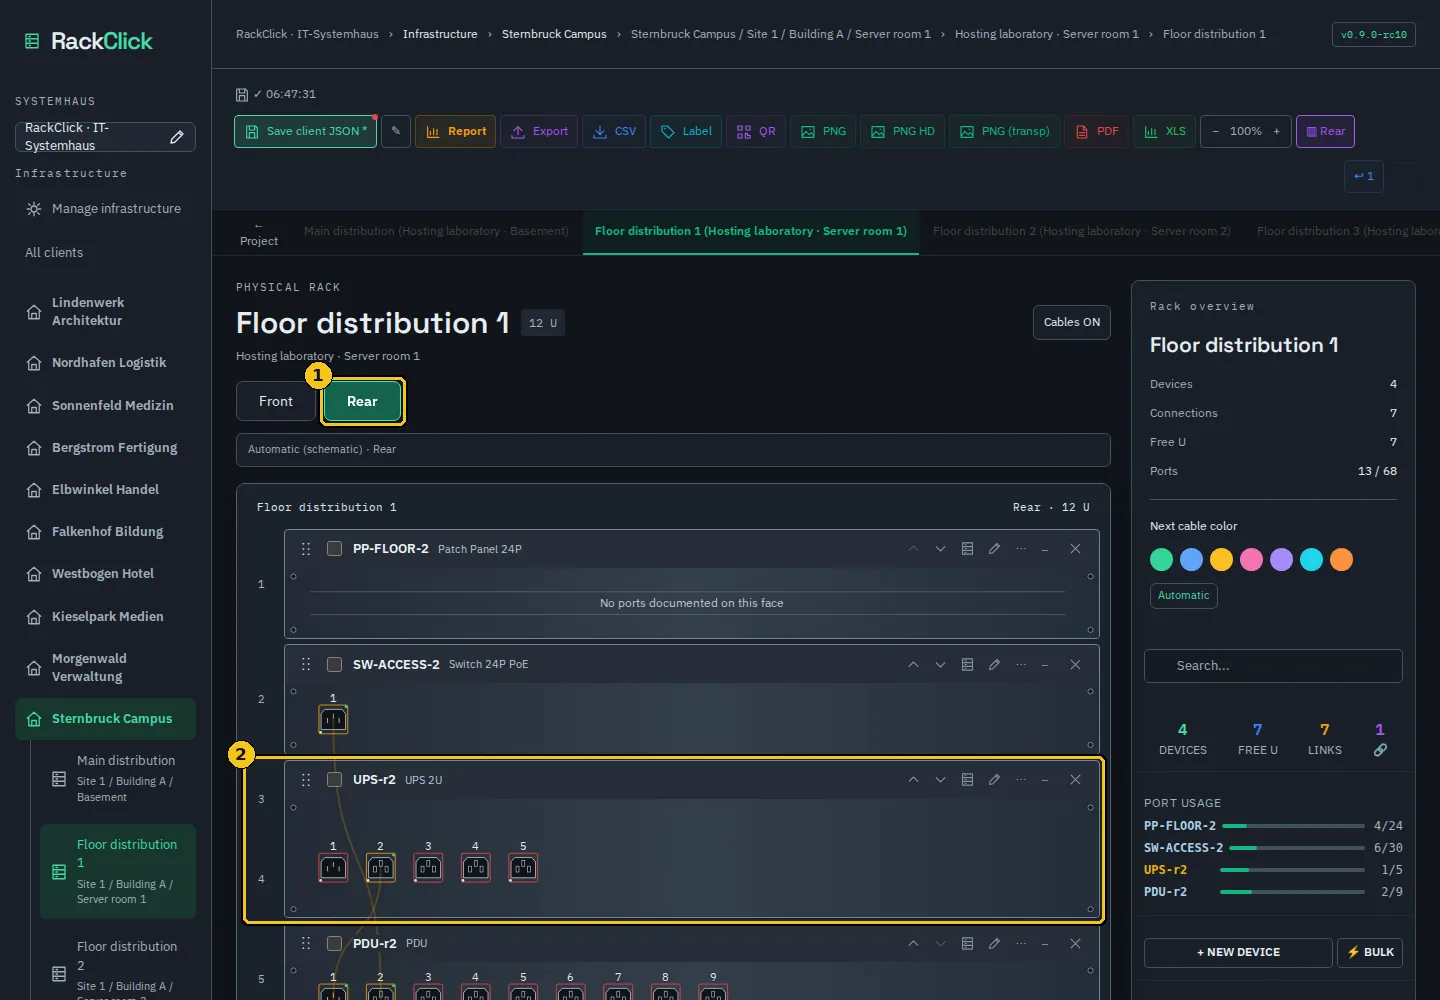
Screenshot 16Rear view with power connections between PDU and UPS.
1Rear
2Power connections
Screenshot 17Configure faces: one row per port.
1Port face
2Save
Note
Faces are a documentation aid. For old projects the application warns: “JSON v0.8 does not store port faces. Both views retain every interface; physical placement is schematic.”
D.7Power: PDU, UPS and Power ports
Ports of type Power document the power path with inlet and outlet roles. It is generic documentation without electrical calculation.
How to
Add devices with Power ports (PDU, UPS, server power supplies) or create a Power group in a custom device.
Set the Power port role of each Power port (Inlet, Outlet or Unspecified) from its actions.
Connect with Click-Click just like a data cable: an outlet to an inlet.
“Power ports connect only to power ports; two declared inlets or outlets cannot be joined.”
When changing a role that is already in use: “This role change contradicts an existing power connection. No changes applied.”
PoE and AC power are different things: PoE is a property of an RJ45 port; Power is a port type.
Caution
“Generic power documentation. No load, voltage, autonomy or A/B redundancy calculation.” A UPS shows NO TELEMETRY because nothing is measured.
D.8State, PoE and colour for a port range
For many ports at once, use the device’s from–to range.
How to
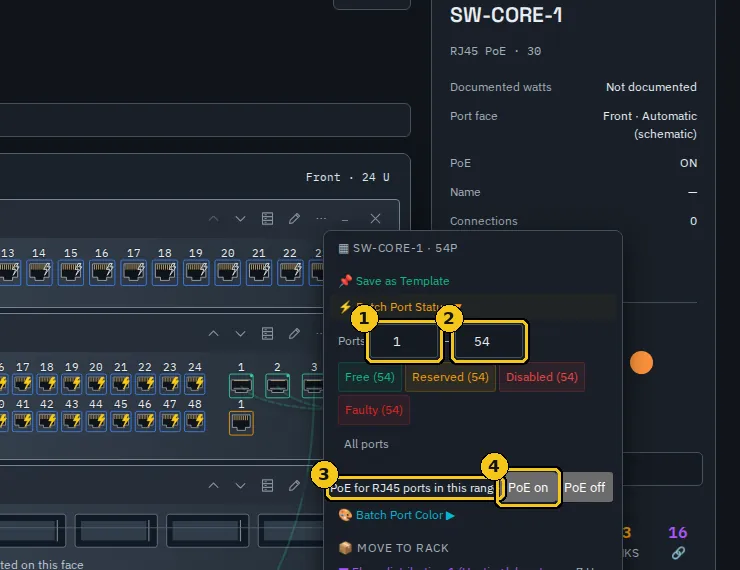
Device options → Batch Port Status.
Type the range in Ports (from – to, port numbers of the device) or click All ports.
Click the state (Free, Reserved, Disabled, Faulty; the number of affected ports is in brackets) or, under PoE for RJ45 ports in this range, PoE on / PoE off.
RackClick confirms “⚡ Ports X–Y → state”. Watts are documented separately, port by port.
Screenshot 18Batch Port Status with the PoE option.
1Ports (from)
2Ports (to)
3PoE for RJ45 ports in this range
4PoE on
Likewise, Batch Port Color applies a colour to a range (“🎨 Ports X–Y: color set”) or clears it (“color cleared”). The range identifies ports by their number within the device.
Note
If the range contains no eligible RJ45 ports, the PoE action does nothing: “No eligible RJ45 ports in this range.”
Part E · Saving, backing up and recovering
E.1Automatic saving in the browser
RackClick saves every change to browser storage. It does not write inside the HTML file.
The 💾 ✓ hh:mm:ss indicator in the toolbar shows the time of the last successful save (on the clients screen, ✓ Autosave).
The dot on Save client JSON * means there are changes not exported since the last export.
Saving depends on the browser and the profile: another browser, another profile or clearing site data makes the project disappear. The HTML file does not change.
Work with a single tab of RackClick: the offline edition does not synchronise several tabs or several users.
If saving fails
How to
Autosave FAILING appears with the notice “Automatic saving is failing (storage full) — Export your project NOW to avoid data loss”. Click Export JSON now and keep the file.
Free space in the browser or switch profile and load the JSON again.
Recovery at start-up
If the saved project is damaged when RackClick opens, the program acts on its own and says so: “Project repaired at startup — original saved to quarantine”, “Autosave invalid — recovered from backup” or, at worst, “Safe mode: no saved project could be loaded. Data secured in quarantine”. Settings then shows the QUARANTINE section (“Data from a failed startup is stored here”) with Created and Reason: you can Download bundle, Download autosave only and, once you no longer need it, Delete quarantine. Classic view (recovery only) is a reduced interface to rescue data if the integrated view does not render.
Caution
On a failure notice, a recovery screen or a quarantine, first export the state still in memory (Export visible project / Download raw storage). Do not clear the browser profile as a first measure.
E.2Exporting and loading JSON
The JSON is your real backup: take it with you, keep it outside the browser and load it on another computer.
Action
Where
Result
Save client JSON
Client view (also Ctrl+S)
rackclick-<client>.json with the racks, connections, locations and metadata of that client
Export full backup
Clients screen
RackClick-backup-all.json with all clients of the Systemhaus
Load
Client view
Replaces the inventory of the active client with a client JSON: “Replace this client’s inventory? Other clients remain unchanged.”
Load full backup
Clients screen
Replaces the complete infrastructure: “Replace the complete infrastructure? Export a full backup first.”
Merge
Client view
Adds the racks of another v0.8 project to the active client without deleting the existing ones (“🔀 Merged: N racks, M cross-rack connections from "file"”). Only v0.8.
Import
Client view
Rack JSON v0.7 (“v0.7 imported as rack”) or connections CSV (“📥 CSV: N connections added, M skipped”)
Export (rack)
Rack view
rack-<name>-<date>.json with a single rack
Working from a USB stick or on another computer
How to
Export the client JSON (or the full backup).
Copy the HTML file and the JSON to the stick. Moving only the HTML does not carry your work.
On the other computer open the HTML and use Load or Load full backup with a copy of the JSON. Keep the original until the result is checked.
Note
The project JSON does not include browser templates, favourites or snapshots. Always check the downloaded file by opening it or loading it in another profile.
E.3Snapshots
A snapshot is a named recovery point inside the browser. It covers the complete infrastructure, not one client.
How to
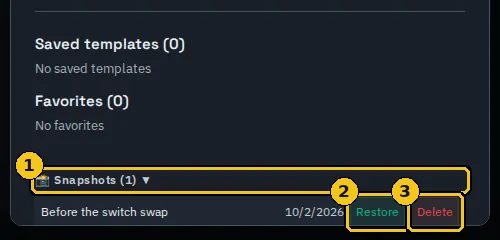
In the client view click Snapshot and type the Snapshot name (e.g. Before the switch swap). RackClick confirms “Snapshot saved!”.
To restore: Settings → Snapshots → Restore. “Snapshots cover all clients. Restoring replaces the complete infrastructure.”
To remove a snapshot: Delete in the same list.
Screenshot 19Snapshot list in Settings.
1Snapshots
2Restore
3Delete
Caution
Snapshots live in the browser: they do not replace the external JSON backup. Export the current state before restoring.
E.4Undo and redo
Almost every action in the rack can be undone and redone while the tab stays open.
Ctrl+Z undoes and Ctrl+Y redoes. The ↩ ↪ buttons in the toolbar show how many steps are available.
The notice “↩ Undo: …” says what was reverted; “Redo” the opposite.
Deleting racks or devices, replacing the inventory with the demo and bulk connections can be undone.
Note
Restoring a snapshot or loading a JSON replaces data: export first if in doubt.
Part F · Reports, labels and exports
F.1Rack and client reports
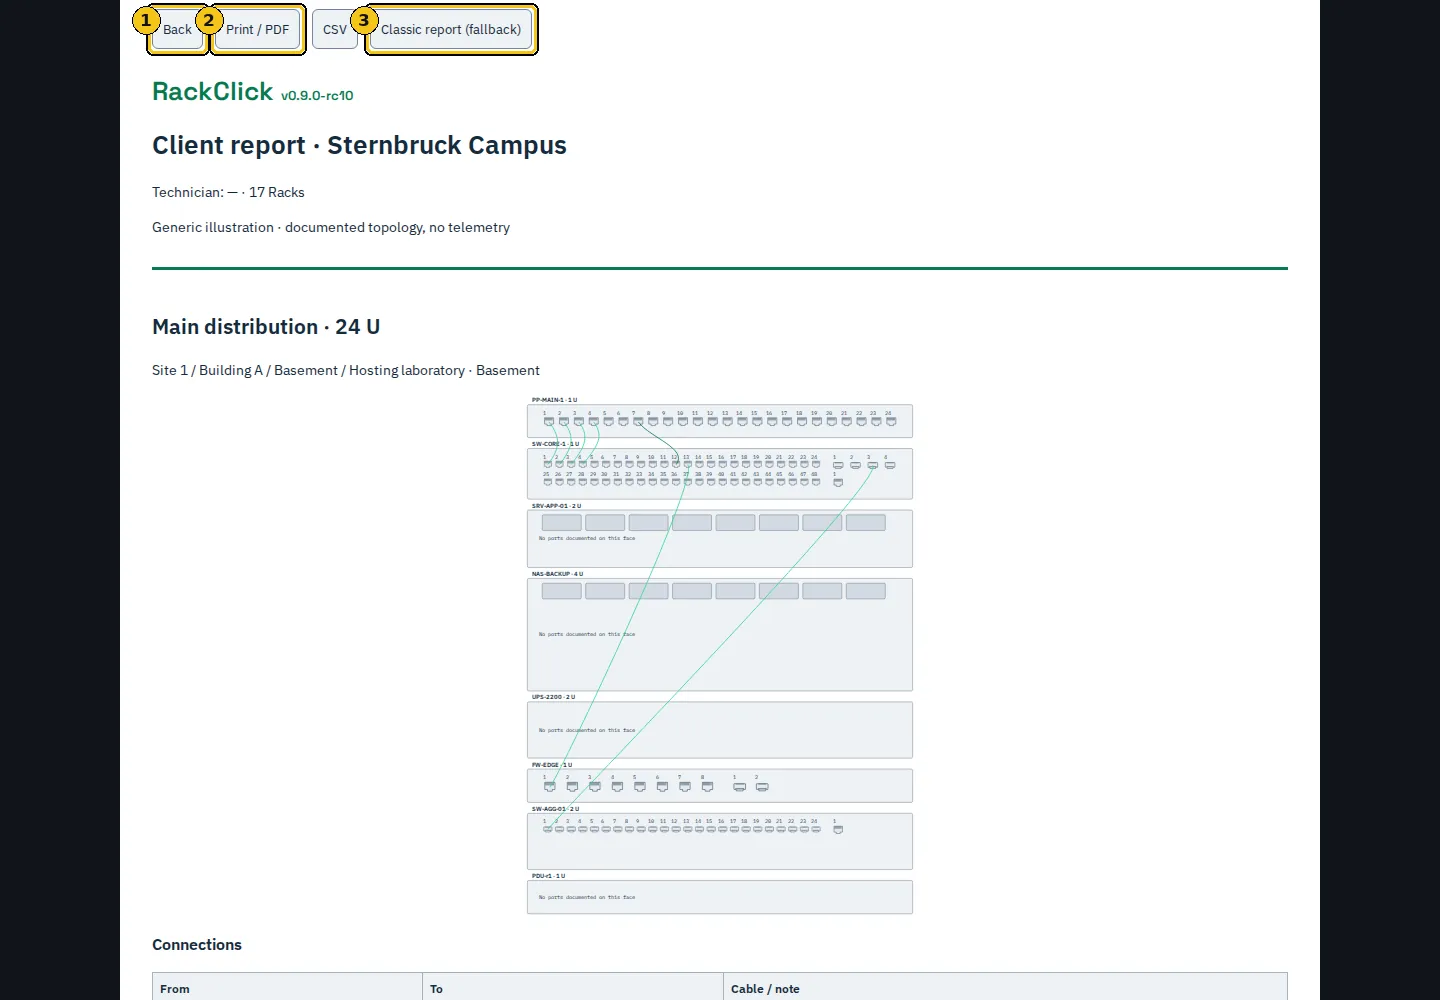
The report gathers the drawing of each rack, its devices and the connection table. It is printed or saved as PDF from the browser.
How to
Client report: in the client view click Report. Fill in Technician first and, if you like, the client Logo: both appear in the header.
Rack report: in the rack view click Report.
Check the scope (client or rack), the technician and the client name. Click Print / PDF and choose a PDF destination in the browser dialog. Check paper size and scale in the preview.
CSV downloads the connections of the same scope. Classic report (fallback) shows the previous report version.
Back returns to the previous view.
Screenshot 20Client report: header, racks with their ports and connection table.
1Back
2Print / PDF
3Classic report (fallback)
If the client has a change log, the client view shows the 📜 Log (N) button and the report includes the section Change log (last 20) with the last twenty entries; “Clear all log entries?” removes them after confirmation.
Note
The PDF is produced through the browser’s print dialog. Texts you type are shown verbatim, with special characters escaped.
F.2Rack labels
Each rack has a label with name, location, devices, units, local connections and identifier.
How to
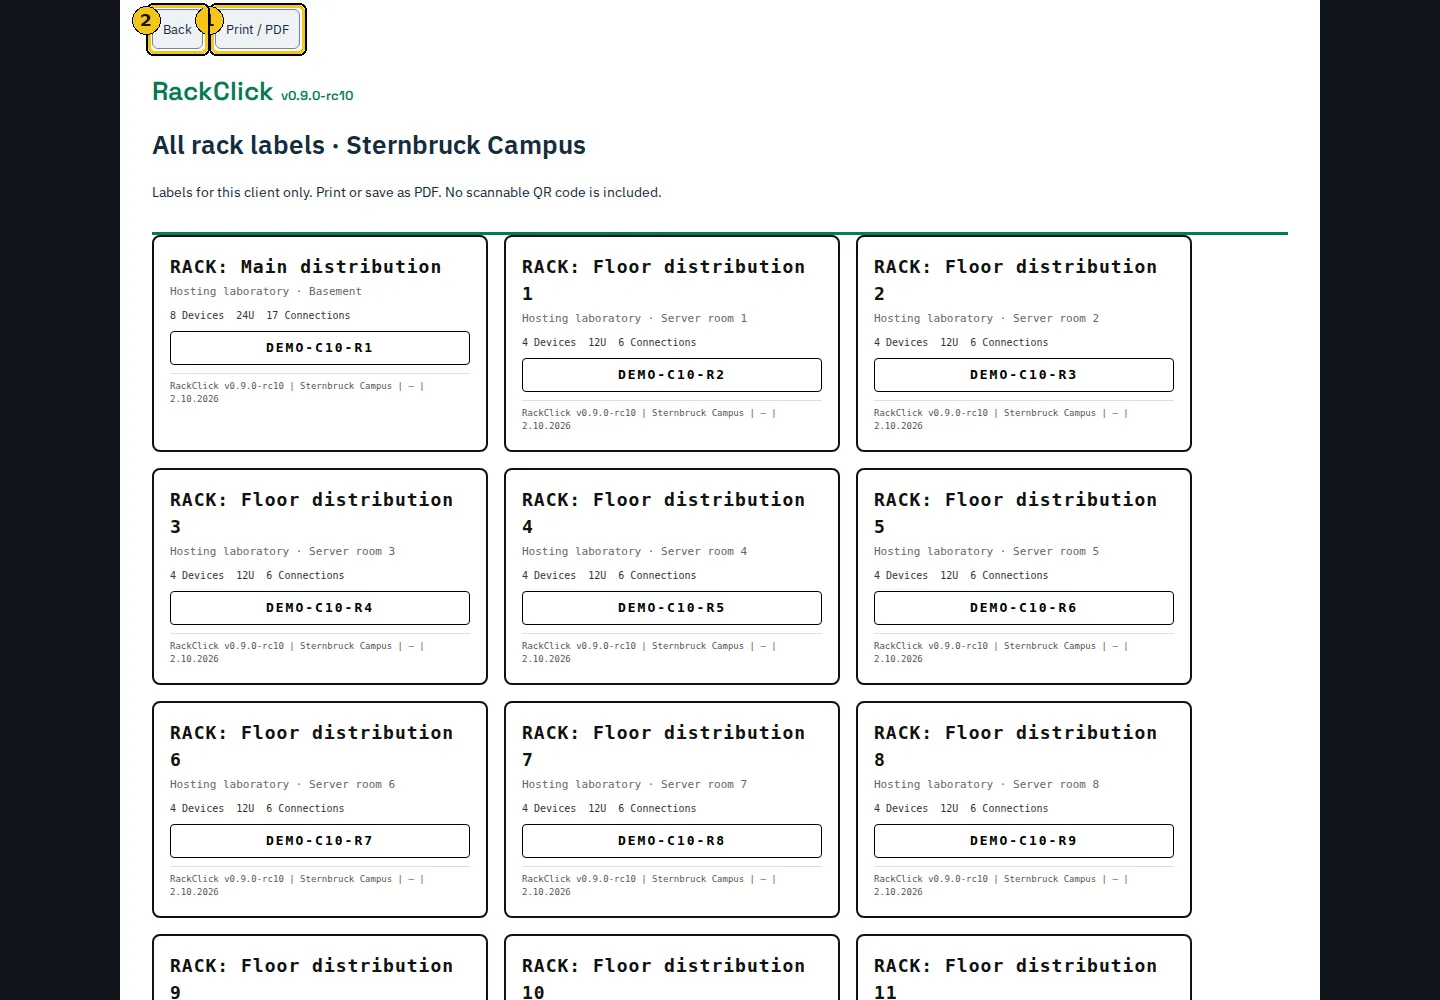
All rack labels (client view): one page with all labels of the client, ready for Print / PDF.
Label (rack view): opens the label of that rack in a print window.
The footer of each label states version, client, technician and date; the Rack ID identifies the rack in the project.
Screenshot 21All rack labels of a client.
1Print / PDF
2Back
Labels count the local connections of the rack, not the cross-rack ones.
“Labels for this client only. Print or save as PDF. No scannable QR code is included.” The rack’s QR button downloads a decorative motif (decorative-qr-not-scannable-…png); the file name says so.
F.3Rack exports: CSV, XLS, PNG, PDF
The rack toolbar offers every output of that rack.
Screenshot 22Rack toolbar.
1Save client JSON
2Edit (rack)
3Report
4Export (JSON)
5CSV
6Label
7QR
8PNG
9PDF
10XLS
11Zoom
Button
File
Content
Export
rack-<name>-<date>.json
The complete rack to import into another project (“📤 Exported "name"”)
CSV
— (opens the file picker)
Imports connections into this rack from a CSV with From Device and To Device columns: “📥 CSV: N connections added, M skipped”. The CSV of a single rack is downloaded from its Report (CSV button, rackclick-<client>-<rack>-connections.csv)
Image of the drawn rack at 3× or 4×, with or without background (“PNG exported ✅”)
PDF
print dialog
“PDF report opened — use Print → Save as PDF”
Label / QR
print window / png
Rack label · decorative, non-scannable motif
In the client view, Client connections CSV exports the connections of all its racks (rackclick-<client>-connections.csv); on the clients screen, All clients connections CSV adds the Client column. Columns: Rack, From Device, From Port#, From Type, To Device, To Port#, To Type, Cable/Note, Cross-Rack, Patch Status, Created. CSV files are written as UTF-8 with a byte-order mark so Excel opens them correctly.
Note
The zoom buttons (−, 100 %, +) and Cables ON/OFF only change the view; exports are unaffected.
F.4Search
Find devices, ports, labels and connections without walking through the racks.
How to
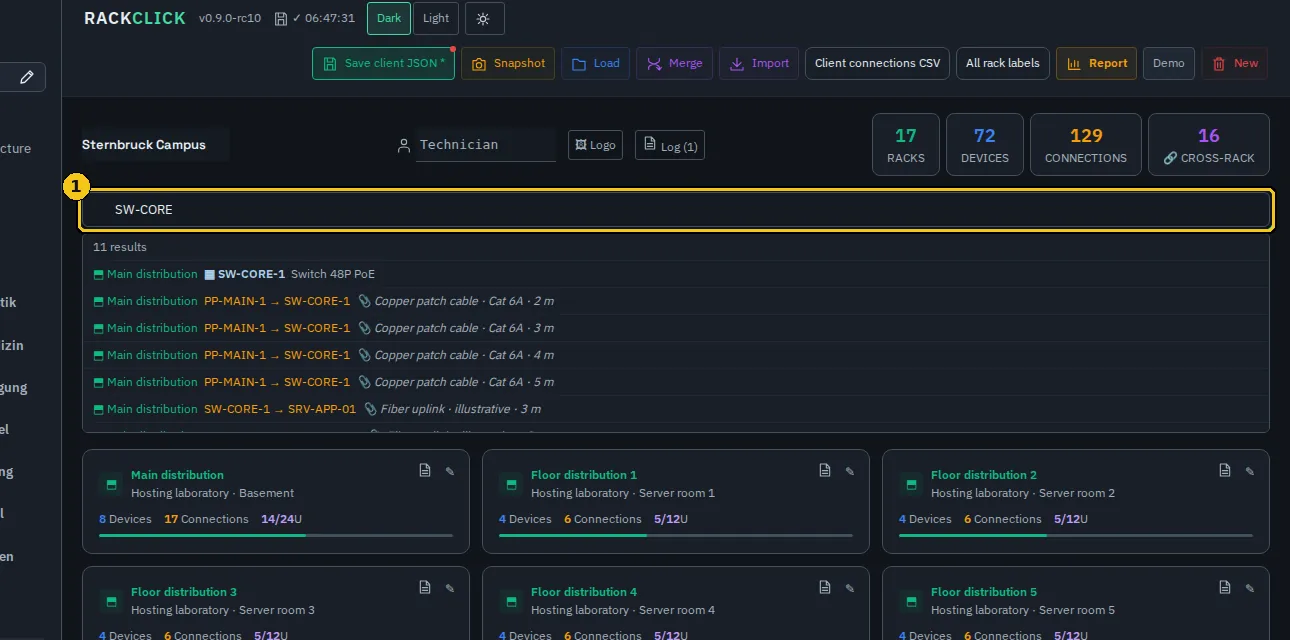
In the client view type into 🔍 Global search: devices, ports, labels, connections.... Results show rack and device; click one to open it. With no matches: “No results for …”.
In the rack view, the 🔍 Search... field in the right-hand panel filters within the rack.
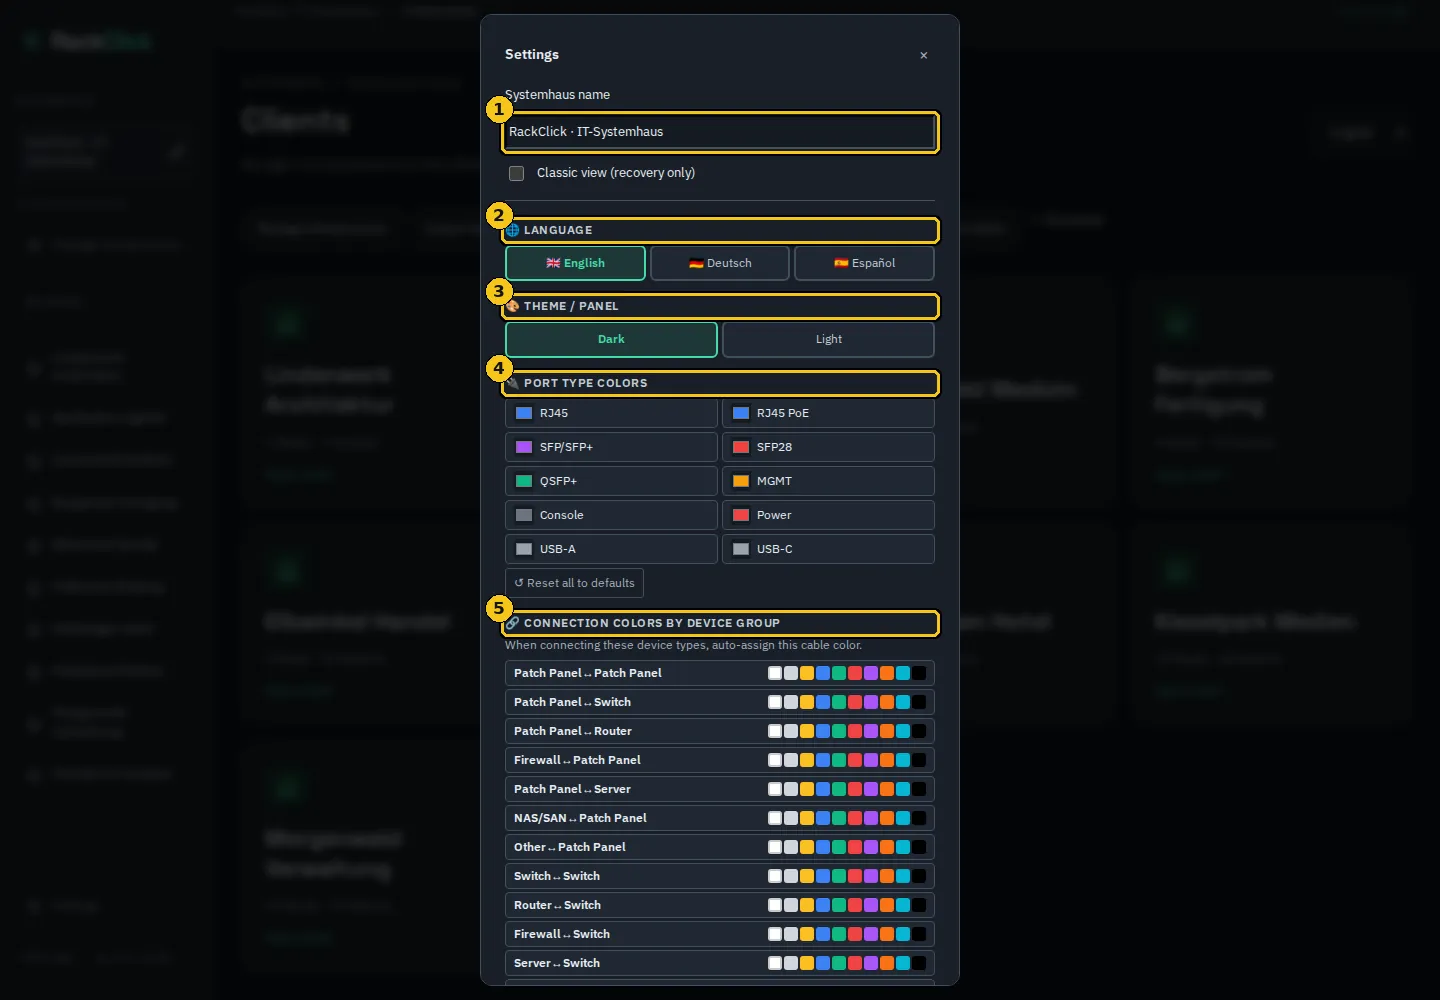
Language, theme, colours and maintenance of templates, favourites and snapshots.
Setting
Effect
Systemhaus name
Your company name in the interface and reports
Classic view (recovery only)
Old interface to rescue data if the integrated view does not work
LANGUAGE
English, Deutsch, Español. Changes controls and sample texts; your names are kept
THEME / PANEL
Dark, Semi-dark, Silver or Light. The client header offers the quick switch Dark / Light
PORT TYPE COLORS
One colour per type (RJ45, RJ45 PoE, SFP…). Reset all to defaults restores the defaults
CONNECTION COLORS BY DEVICE GROUP
“When connecting these device types, auto-assign this cable color.”
Saved templates / Favorites
List and removal
Snapshots
Restore or delete
QUARANTINE
Appears only after a recovery: download or delete the rescued data
Screenshot 24Settings.
1Systemhaus name
2LANGUAGE
3THEME / PANEL
4PORT TYPE COLORS
5CONNECTION COLORS BY DEVICE GROUP
6Saved templates
7Favorites
8Snapshots
Screenshot 25Light theme.
G.2Demo data and new project
Synthetic data is for learning and for playing through scenarios. It is not real data.
Button
Where
What it does
10 demo clients
Clients screen
Replaces the complete infrastructure with ten synthetic clients (Small office, Office building, Retail, Workshop, School, Hotel, Healthcare practice, Warehouse, Campus, Hosting laboratory). It asks: “Replace the complete infrastructure with 10 synthetic clients? Export a full backup first. You can undo.”
Demo
Client view
Replaces the inventory of the active client with “Demo: 2 racks + port labels + cable notes”
New
Client view
Empties the inventory of the active client after confirming “⚠️ Delete everything and start a new project?” (other clients are unchanged)
Translate generated demo text
Client view
“Translate only unchanged generated demo names and notes? Your edits stay unchanged.”
Note
Replacing actions ask for confirmation and can be undone with Ctrl+Z while the tab stays open.
G.3Gestures and shortcuts
Everything done with mouse and keyboard in the rack view. The rack’s bottom bar reminds you: “L-click: connect · R-click: status/PoE/label · Dbl-click: label · cross-rack · bulk · Ctrl+Z: undo · Ctrl+S: save · Esc: cancel · Del: delete selected”.
Gesture / key
Action
Left-click on a free port
Select source · second click: connect
Left-click on a connected port
Open the connection (note, patch status, colour, Disconnect)
Right-click on a port
Label, state, PoE and watts, colour, connect to rack
Double-click on a free port
Quick label
Double-click on a connected port
Reconnect to another destination
Hover over device / port
Tooltip with the documented data
Drag ⋮⋮
Reorder devices
Esc
Cancel selection, reconnection or cross-rack; close dialogs
Ctrl+Z / Ctrl+Y
Undo / redo
Ctrl+S
Save client JSON
Del
Delete the selected devices (with confirmation)
G.4File formats
What each file RackClick writes or reads contains.
Import (client view) · CSV (rack toolbar); From Device and To Device columns required
Rack report / client / all-clients CSV
UTF-8 with BOM; unresolvable rows are skipped on import
XLS
—
Rack XLS
Sheets Devices, Connections, Summary
PNG
—
Rack PNG
Image at 3× or 4×, with or without background
PDF
—
Print dialog
Reports and labels
G.5Limits and assumptions
What to know before handing over documentation made with RackClick.
Everything is documentation entered by a technician: states, watts, IP addresses, serial numbers and notes. Compare the drawing with the real installation before hand-over.
The online demo saves in the browser of whoever opens it; there is no shared storage and no users.
The offline file has no accounts or permissions. Grouping by client is not access control.
Front/rear faces are schematic; power is documented without electrical calculation.
Labels count local connections; the QR is decorative.
The PDF depends on the browser’s print dialog.
Keep a single tab and export JSON regularly.
The earlier rc9 file shows a few English strings in German and Spanish; v0.9.0-rc10 translates them (see “What RackClick is”).
G.6Server edition (under development)
Besides the offline edition there is a project for a server edition for Systemhaus companies with several users. It is not available and is not part of this file.
Status as of 29 September 2026: estimated progress 45 % of the complete delivery, with no installable candidate and no adoption. What is published here describes the planned scope and what has been verified so far, not a finished product.
Block
Goal
Status
Foundation
Windows server with PostgreSQL database, sign-in, shared Systemhaus and clients, safe writes and audit
Lab-tested: start-up, sessions, clients, scopes and transactions
Hierarchy and inventory
Sites, buildings, rooms, racks, devices, Click-Click, batches, PoE/AC with the same RC9 interface
Basic walkthroughs tested; full parity pending
Administration
Users, groups of people and of clients, capabilities, effective permissions
User creation and listing tested; groups, reset and deactivation pending
RC9 parity
Reports, exports, tools and accessibility in EN/DE/ES
Pending
Installation and operation
Windows installer, service, HTTPS, backup and restore
Pending
Manual and final package
Illustrated manual from scratch, complete package, final QA
Pending
Planned later: round trip with the field (field package and controlled return). Directory integration (AD/OIDC), external portal and MCP need a separate scope.
The offline edition will remain: the server uses the same interface components and reads the same client JSON files.
Adoption of the server edition depends on the product owner’s final QA.
Note
This section will be updated with each delivery. Until then, the functional reference is the offline edition v0.9.0-rc10 described in this documentation.
G.7Glossary
Term
Meaning
Systemhaus
The service company that looks after the clients.
Client
A company served, with its own racks and reports.
U / HE
Rack unit (44.45 mm). A rack has 6–48 U.
Click-Click
Two clicks on two free, compatible ports create a documented connection.
Free · Reserved · Disabled · Faulty
Documented port states: Reserved asks for confirmation; Disabled and Faulty refuse new connections.
Documented PoE
Filled yellow bolt: the technician recorded active PoE and, optionally, watts.
PoE budget
Total watts recorded for a device; compared with the documented watts of its ports.
Cross-rack
Connection between two racks of the same client.
Face
Front or rear of a device; each port is documented on one face.
Inlet / outlet (Power)
Role of a power port: receives or delivers power.
Patch status
Planned, In Progress, Done or Tested: progress of a connection.
Autosave
Automatic copy in browser storage.
Snapshot
Named recovery point, inside the browser, of the complete infrastructure.
Quarantine
Data rescued after a failed start-up; downloadable from Settings.
Full backup
JSON with all clients.
Template / favourite
Device saved as a starting point / highlighted template in the catalogue.
 RackClickUser documentation